How to Upload All My Photos to External Hard Drive
The Photos app in macOS is a great place to save your memories and keep them safety. Withal, if you're like most users, your photo library may be an ever-expanding entity. After a while, the storage demands of your library may get-go to add up, causing a lack of storage on your Mac.
Professional photographers and videographers are fifty-fifty more than prone to running into storage issues due to the size of their photograph libraries.
One option to circumvent this issue is to move your Mac photo library to an external bulldoze. We'll show you how to do that beneath.
Start, Consider Backing Up Your Photos to iCloud Drive
Backing upwards your library to iCloud Bulldoze allows yous to shop full-resolution versions in the cloud with lower-resolution versions saved locally to your Mac.
To enable Photos for iCloud Drive:
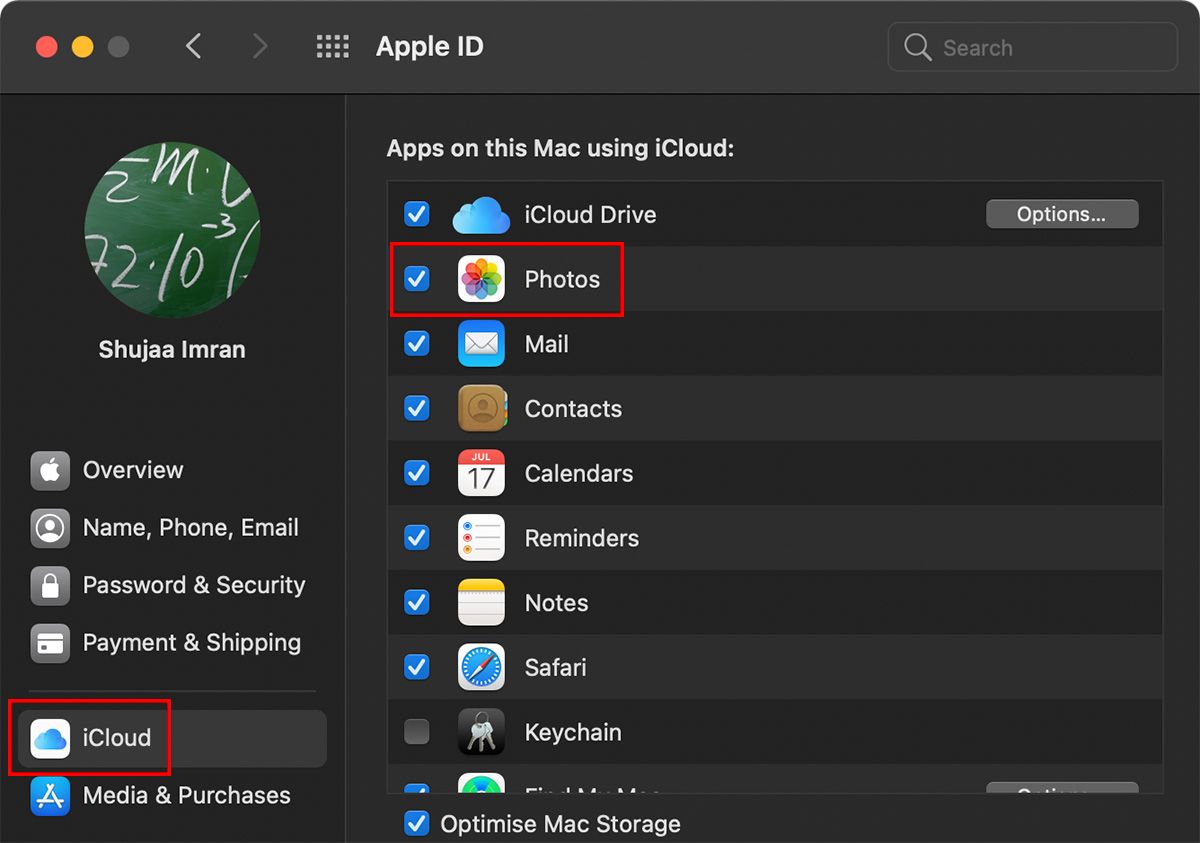
- Open upward System Preferences on your Mac.
- Click Apple ID in the top section of the window.
- Select iCloud from the left-hand pane and enable Photos.
This will automatically back up all the media present in your default Photos library on your Mac. Once done, low-res photos volition replace the loftier-res photos on your device (yous can cull to download the full high-resolution photo at any time, if needed). This will automatically relieve some space on your Mac.
It is of import to note that if you delete a photo taken on your iPhone, which is synced with iCloud, it will be deleted from the cloud as well. Thus, we recommend moving your Photos library from your Mac's internal storage to an external drive for meliorate safeguarding.
How to Choose an External Drive for Your Mac Photo Library
If y'all have a large photo library on your Mac, transferring the media to an external drive can save you lot valuable storage infinite. But there are some considerations you need to make to choose the best external drive to use.
What Type of Storage Should You Apply?
Since accessing photos and media can be a data-intensive task, we recommend getting a fast external storage device. A USB iii.0, USB-C, or Thunderbolt difficult drive may entreatment, simply if you intend to spend time using the Photos app editing the photos so on, the best pick would be to consider flash storage (an SSD). Check out our guides to the all-time external hard drives and what to consider while buying an SSD.
What External Bulldoze Format Should You Use?
Before yous begin, brand certain the external drive you're going to employ is formatted as Mac OS Extended (Journaled). We recommend formatting the bulldoze before usage so that you don't come across whatsoever issues. You tin format your external drive directly from Deejay Utility in macOS.
Transferring Your Mac Photos Library to An External Bulldoze
The Photos app on macOS stores all your media in the form of a Photos "library." Past default, the Photos library is nowadays in the Pictures folder in your macOS Dwelling house folder. We'll be moving this library directly to an external drive, before telling the Photos app to load the library from the external drive past default.
Follow the steps below to do this.
Adhere your external drive to your Mac, and brand sure it is showing up in the Finder sidebar.
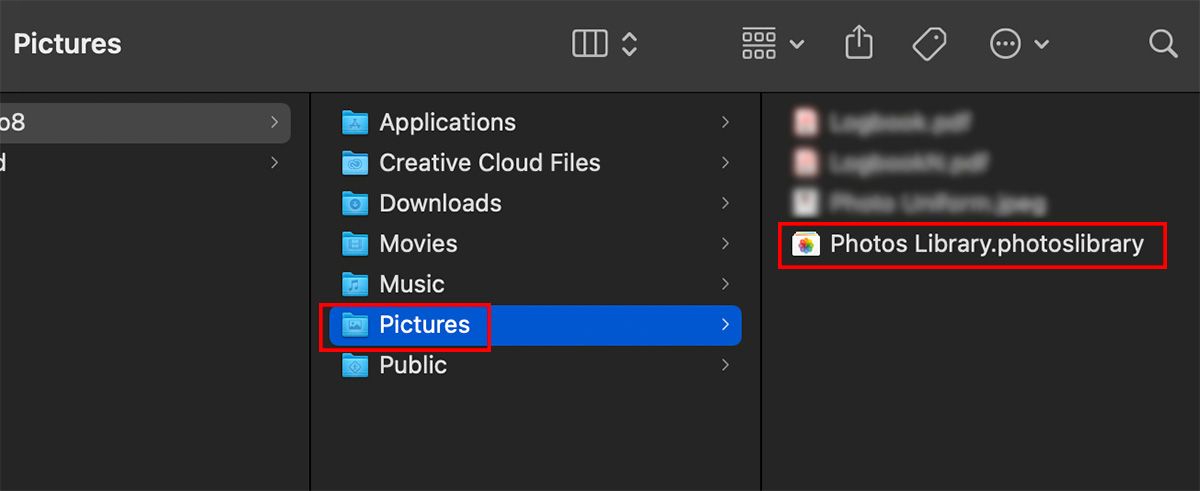
Open a new Finder window and press Cmd + Shift + H to get to your Home folder, then select Pictures. Yous should see the Photos Library file hither.
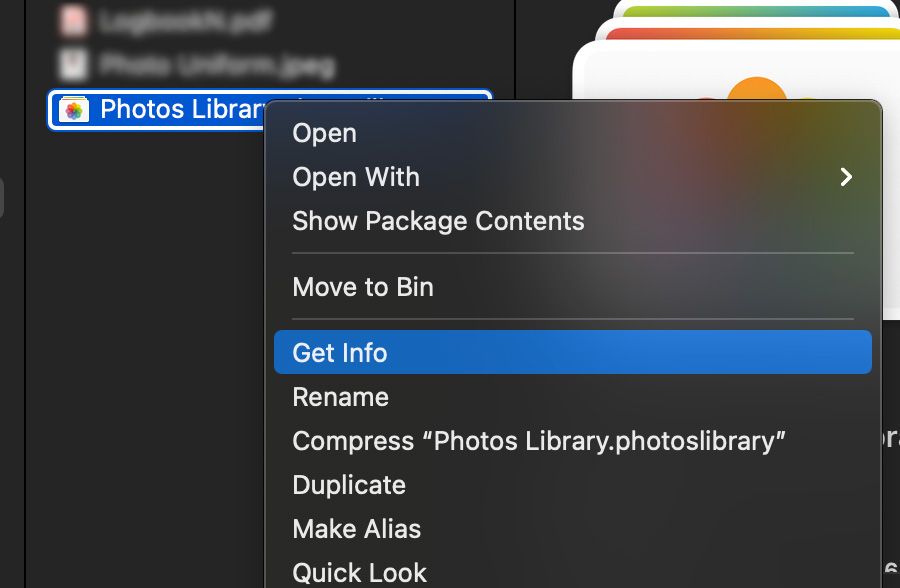
We recommend making sure that you take enough costless space for the library on the external drive. Control-click on the Photos Library file and select Become Info to cheque the storage size for the library.
Once verified, drag and drop the Photos Library icon onto the hard drive icon, either in Finder'south sidebar or on your desktop. You can also just copy (Cmd + C) and paste (Cmd + Five) the Photos Library file onto your external difficult drive. The re-create may take some time depending on how large your library is.
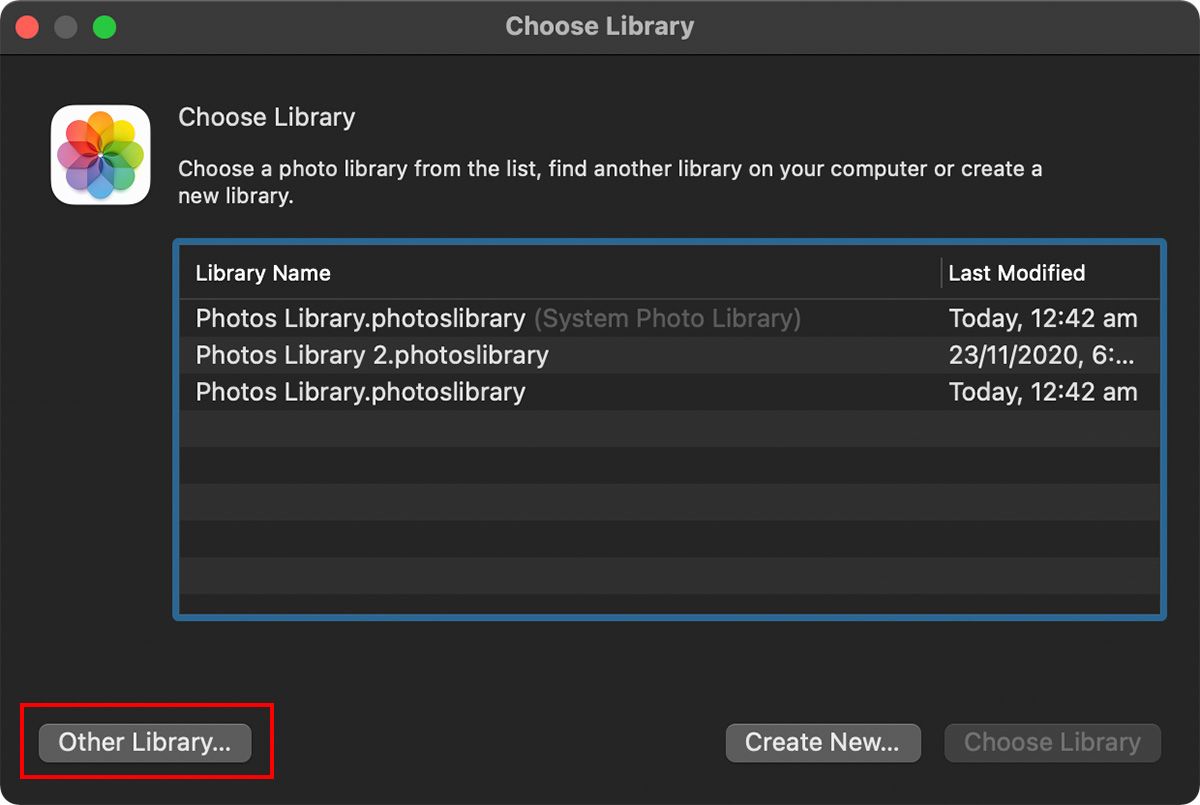
In one case finished, launch the Photos app on your Mac while property the Option, prompting Photos to look for a new library location. So select Other Library and navigate to the new location of your Photos Library file on the external drive. The Photos app should load the library (with all your photos) normally.
One time loaded, click on Preferences > Full general from the carte du jour bar in Photos. Select Use as System Photo Library.
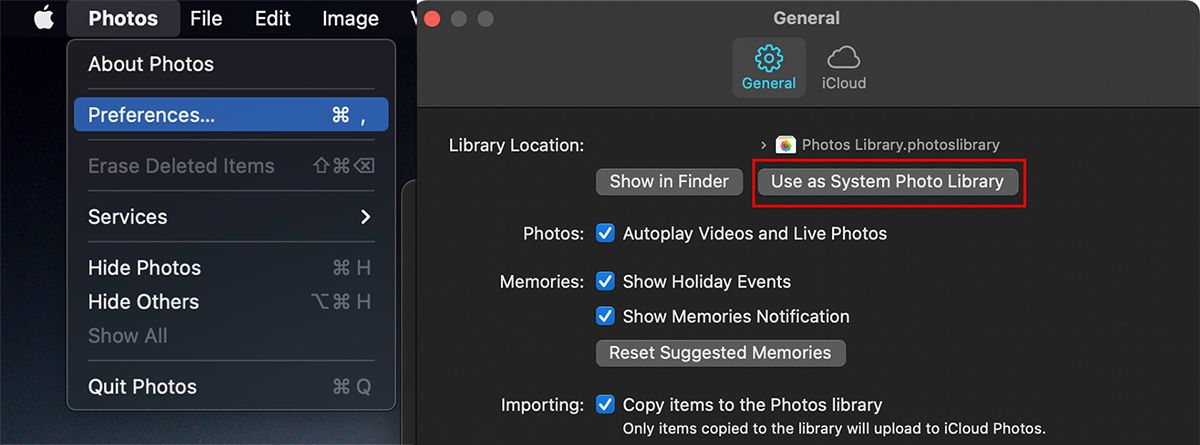
This footstep will make the Photos app use the library stored on the external drive as your Organisation Photo Library.
Note: This also means that if you lot launch the Photos app without the external drive continued, the Photos app will enquire you to select an alternate library to continue.
If you still wish to utilise iCloud Photo Library with your Mac, y'all'll have to re-enable information technology from Organization Preferences. Open up up System Preferences on your Mac. Navigate to iCloud and enable Photos to plow iCloud back on for your Photos.
Removing the Old Library
Test the new library by disconnecting your external drive to ensure that the photos have indeed moved to it. Once reconnected, ensure that everything works correctly and all media is loading.
When y'all're sure all is well, you can navigate back to the Pictures folder on your Mac and move the old Photos Library file to the Trash. To immediately gratuitous up space on your internal hard disk, empty the Trash to permanently delete the old Photos library.
That's it! You've successfully moved your Photos library to an external bulldoze, on which yous can continue to view your photos and videos as usual.
Using Multiple Libraries in the Photos App
You lot tin can too choose to utilize multiple libraries in the Photos app. By creating multiple libraries, you tin sort all your media co-ordinate to type, occasion, or device and keep them in separate locations.
This is more than helpful with an external drive, as yous are non limited by the restrictions of your Mac'south internal storage.
Here's how to create multiple libraries:
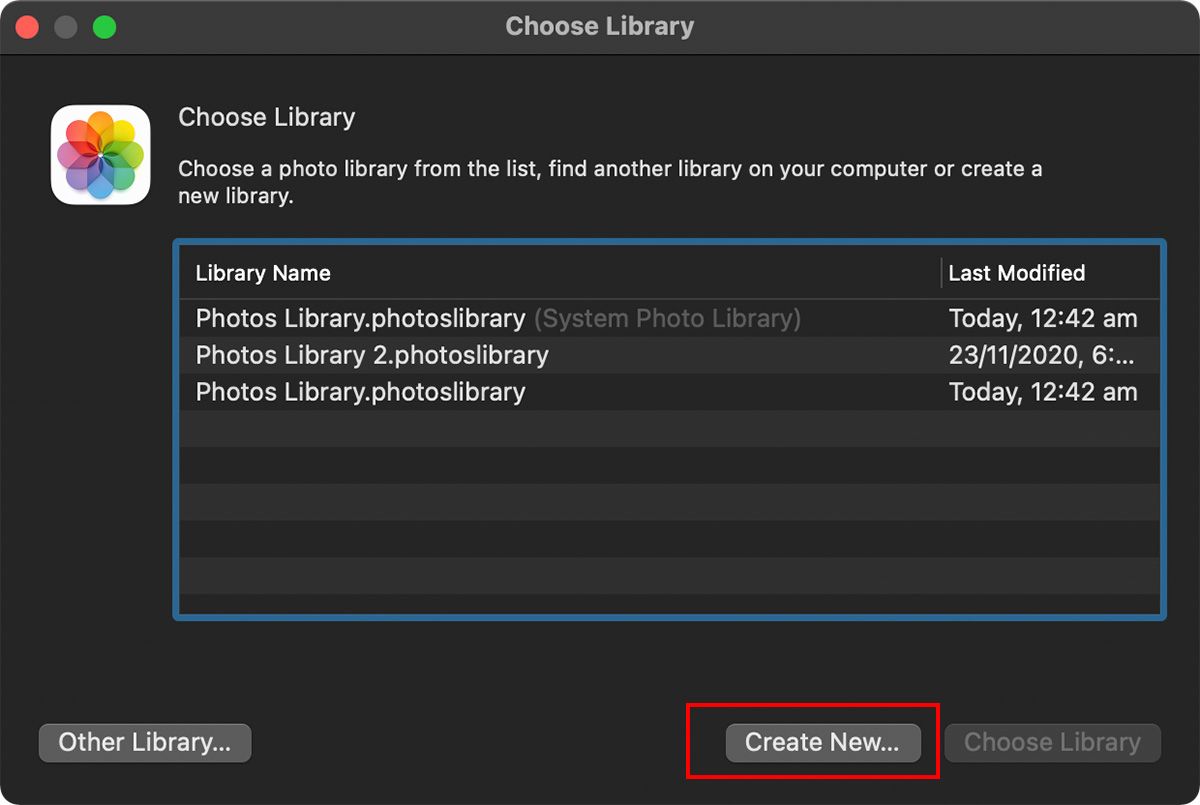
- To create a new library, only hold down the Option key while launching Photos.
- Choose Create New.
- Select the location and name for your new library.
Practise note that you tin only use ane library at a fourth dimension in Photos. Whenever you desire to use an alternate library, you will have to restart the app (go along Option pressed downwardly while launching Photos) and select the library y'all'd like to open.
If y'all switch to a library other than the Organisation Photograph Library, the changes you make won't be reflected in iCloud Photos, as iCloud Photos only sync changes from your Organization Photo Library.
Backing up your photos and videos using Photos on your Mac is a good idea. This tin can help free upwardly storage on your portable device (such as an iPhone or iPad). Having a backup on an external bulldoze allows you to save some much-needed storage space on your Mac, and you tin even access your library on other computers if needed.
About The Author

Source: https://www.makeuseof.com/how-to-move-photos-library-to-external-drive-on-mac/
0 Response to "How to Upload All My Photos to External Hard Drive"
Post a Comment